OK, I thought it was about time I started posing pictures as the convertion takes place. For those with no knowledge of outfits, the days of just bolting on a sidecar are gone. You have to build a subframe to mount it, you need Leading link forks to steer it, and to cope with the power of modern bikes you need car tyres!
You can go to a specialist and pay out around 10K to have your bike converted, or you can bite the bullet and do it yourself!
So far I have put in every spare hour I have on the damn thing over a 6 week period and this is how far I have got…
Starting from the front, we have the Leading Link forks. They are made by Wasp and come from my ZZR powered outfit. By a stroke of luck the distance between centers of the downtubes was the same as the ZZR, so to mount them in the Ducati was just a case a machining up some spacers. The Leading links are needed to move the wheel forward increasing the trail and lightening the steering. The front swing arm on the forks are mounted on an off center cam afair, making the rake adjustable. The wheels are EML, again from the original ZZR outfit, they use Motorcycle hubs and car split rims. The front was no trouble but the rear took me about two weeks of evenings to machine up various spacers, and adaptor plates to get it to fit along with the original Ducati rear caliper carrier plate. My intention in the long run is to make a new plate to take a larger rear brake (same for the front, but one step at a time)
Just spent the last couple of days making the subframe to accept the sidecar. This wraps arounf the engine mounting points using new engine bolts and adaptors I am halfway through turning up as I type this (see the next picture!)
once I have finished making up the subframe and engine mounts/bolts it all needs welding up. I think I will bring a specialst in at this point, as my welding is pretty pants (almost as bad as my spelling!)
I also need to make a thumb brake for the sidecar caliper, as I am damned if I am going to pay £250 for one - a new battery box and remount the radiator as it currently fouls the subframe. Then I have the small matter of the fairing, which I either need to drill holes in to allow the mouns through or leave off on the sidecar side and make a joining piece.
Ok, so hardly anyone is interested, however I shall continue to talk to myself and “Desmo” Progress to date. This morning I offered up the sidecar for the fiorst time. The back fittings do not fit and will need to be re made, but overall I am not too worried, no major mods needed to the sub frame (which is now on Mk3!)
Close up of the fittings. My intention is to have six (the usual amount is 4) All good fun! And don’t worry Jilly, this is just a small taster of the project, the full write up for Desmo will be a much more sordid tale involving scenes remenisant of Caligular. Well similar anyway?
well, I find it interesting Anything that requires a bit of thought / free thinking / skill gets my vote, look forward to receiving the article and pics!
Took the tacked up sub frame and associated fittings to a welder today. I know its a bit of a cop out, but this thing is a double adult, and expected to take two weeks luggage, camping gear and booze on long trips, so I thought a proffesional ought to do that bit.
Its always a worry when you are using someone new, but I knew I had gone to the right place when I saw a stunningly restored Traction engine in his yard!
I know, its such a small world too, the chap knew… and the traction engine was the one that invloved the RT450 about 5 years ago when…and he was able to…
I’m also following your sidecar build keef, but as my engineering and welding skills are close to nil, I’m not in a position to comment.
Its always nice to see a traction engine in good condition, I was lucky enough to meet Three steam rollers on my trip home for dinner today and I slowed down to admire each one, much to the annoyance of the oncoming traffic that was trying to get past them.
I am always interested in anyone who is making a few changes to a Ducati and you have history Keef, keep it up.
I have an idea in the back of my mind, a frame with a v5 and a disc cutter in the shed, this winter may be the right time to upset a few bevel owners!
Regards,
Colin.
… and on the topic of Ducati sidecars - look out for an article and pics in Desmo 198! (No, it’s not ready yet …it’s an article that I’ve just received )
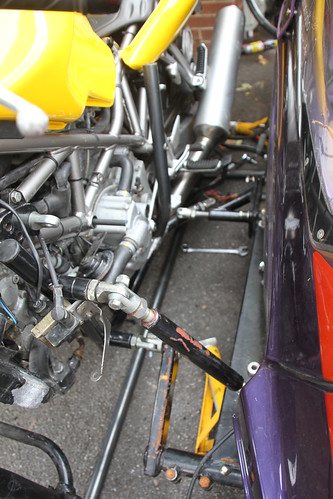
The small black clamp and fitting is the one used by Charnwood to attach the rear upper fitting to my Monster frame. I decided to improve on this by making two clamps each held to the frame by 4 M8 bolts, not one as the original, and then linking the two clamps with a brace accross the frame. the fitting is a 3/4 UNF (about 18mm) thread and is mounted midway down the clamp so as to equalise the forces between the two sides of the frame.
The new Pretech calipers that replaced the two brembos. The bracket is rather rough and ready, but I can make it look pretty once the outfit is on the road.
Side view showing land rover master cylinder that operates the rear brake and the two front left hand Pretech 6 pots and the off side rear sidecar mount and frame brace. Yes I know the clamp is bolted right up, I need to get some new 8.8 bolts!
Two 6 pot calipers and the Grimeca two pot brake on the sidecar was too much for the standard master cylinder, so I have fitted this curious example of chinese engineering. Say what you like its gotr a 19mm piston and is a radial mount - all for £58 from Hong kong.